Wednesday 30 December 2015

Ginger Jeans Disappointment

I took these photos yesterday when I was very excited.  Then soon after I was not very excited. I was very disappointed.  I'll get to that part later.  These are the Ginger Jeans from Closet Case Files


I have been lurking in her shop for months, looking at local denim sources, options for buttons and rivets and reading through the sew along over and over.  My denim history as an adult woman is pretty dismal, ranging from Target when I was desperate to City Chic denim which becomes more and more a disappointment each passing year.  So this new project seemed like a big moment for me.  I really want to no longer be dependent on those stores.  Or any stores.

I spent a long time looking for hardware.  I searched though eBay and etsy but didn't jump on anything, read through reviews of rivets and jean buttons, asked in Facebook groups.  One trusted online friend told me to just not bother without spending $600 on the special machines.  I pushed through that low point.  I tried to buy from a local supplier M.Recht but the site wanted an Australian Business Number.  Remember me mentioning the internet trying to suck the soul out of me.  Yeah I was trying to source for this project.  Remember in my head these are the jeans that make way for all of the jeans for the rest of my life pretty much.  So I am looking for the best, or at least a good source of hardware that I can buy from again.  I finally decided it was a coin toss between ThreadTheory and TaylorTailor.  The Australian dollar was better against the Canadian than the US so I went with ThreadTheory.

I found some stretch denim in the Alannah Hill outlet, but chickened out using it my first try.  I found some denim that felt very similar from Spotlight for my muslin.  I bought the ebook with the pattern.  You could totally do without the ebook and just use the instructions and sew along if you want but if you need a bit more hand holding it's good.  I appreciated it.


These are technically a wearable muslin.  I SHOULD have just cut out a pair of jeans proper instead of shorts but this seemed more approachable as a project.  I wanted to try view A first.  I didn't have any top stitching thread in my stash so I used some army green standard thread that didn't look horrible in my testing.  I used an edge stitching foot which is AMAZING for the top stitching.  My measurements atm are a 33" waist and a 45.5" hip.  That corresponds to a 14 waist and a 18 hip.  That sounded super scary grading two sizes in such a small gap.  I cut a 16 waist and graded to a 18 in the hips keeping the height of the 18.


Heather suggests basting everything together after the front pockets go in to check the fit.  I was a good sewing person and did just that.  When I tried them on the first time I felt so frumpy and not at all the sexy denim goddess everyone online said they felt like wearing their Gingers.  After lots of pinching and squinting in the mirror I came to a few conclusions. They were to big everywhere not just in the waist.  My crotch length was too long, an adjustment I had anticipated because I have trouble with that in RTW.  And after wearing City Chic denim for so long the balance of the front and back pieces didn't feel right.

Let me try and explain.  City Chic cuts the front of their jeans a lot narrower than the back pieces, this is very slimming at the front as there is less space between the pockets and fly and creates an illusion of a curvier backside which in this society of Kardashian worship is not a bad thing.  The side seam just felt like it was in the wrong place.  Not what I am used to.  I cut the front's two sizes smaller at the side seams and trimmed a bit off the crotch length and put them back together, hammered in a button and tried them back on.  And I was so happy.  The clouds parted and I shimmied around the house in the best shorts that have ever been on my body.


Have to tweak the pocket placement on the next pair.  Not bad though.


Later that night something bad happened.  I plucked this picture of Instagram.  Button snapped off.  I am not sure if I bent it or did something wrong but I got very discouraged.  My sewing mojo is still recovering.


Friday 25 December 2015

Last Christmas Present Negroni Shirt

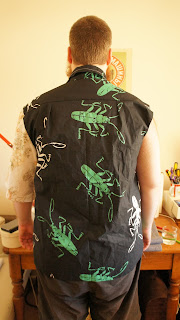
At the start of December I started work on the Brothers shirt.  I got it finished at 4:30 am Christmas morning but I got it finished.  As you can see it is not purple plaid.  Luckily I stumbled on some COTTON/LINEN blend Hawaiian print at the Boxhill Spotlight opening sale.


I was very pleased with my find.  Now lets look at some horrible pictures of muslin's.


I used the Negroni shirt pattern from Colette/Walden.  Muslin 1 is a straight size XL.  The result isn't too bad. I pushed shoulder seam back a cm, raised the arm hole a lot, gave it a little extra room in the hips, and shaved off a little off the bottom of the upper back piece.  The Brother has rounded back shoulders so there was extra room there and I really wanted that seam to look horizontal.


Muslin 2 looks much better.  We were happy enough with it to cut out the good one.  This took longer than I had hoped.  I don't know what I did when I prewashed it but it was really off grain when I laid it all out. I cursed and swore and wrestled with it for a few hours.  Some googling later I found Madalynne's article about grain perfection.  I sewed the whole thing together selvage to selvage, ripped end to ripped end and washed it again.  It worked! mostly.  The ends were bang on grain, some parts in the middle were still a bit skewiff.  I guess it works better when the length isn't 5 meters.  The buttonholes were the real pain.  My machine from the 80's has step by step buttonhole, but I don't really like it.  I have some vintage Singer buttonholers that I really like and have had good results with in the past.  But last night it just could not make a good buttonhole consistently.   Never let the machine know you are in a rush!

Not so good picture from Instagram
I don't think he is sold on the idea that cotton/linen will be more comfortable then polyester.  We will have to see if he keeps wearing it. 

Friday 11 December 2015

Tessuti Kate Top


Tessuti put up the call announcing another of their competitions in November.  The Kate Top.  Had to give it a go, especially since mid November I imagined I would have all the time in the world to make clothes not on the Christmas present list.  Guess who got notified today she will be doing six weeks of placement in a row, starting first week of January.

Tessuti competitions in the past have specified that the fabric used must be from their store.  This time that was not necessary.  I went through my "special" stash.  Fabrics that are either really expensive or sentimental for some reason.  I found this silk in Darn Cheap a couple of years ago.  It was $20 a metre and felt like nothing I have ever felt before.  It is a thick heavy, drappy silk with a matte side and a shiny side that is so soft it feels like suede.  It was fuchsia pink.  I kept coming back to it for months until one day for some reason I had some extra cash and bought two meters.  Dyed it with a lot of blue food colouring and white vinegar.


When I was young and naive I wanted to be a textile designer.  Or a shoe designer.  Well there is a textile design degree offered here in Melbourne so I wasted almost three years studying something I would have hated as a job.  My favourite teacher took me aside one day and just said "this is not for you".  Cue breakdown at 20.  Anyway.  I had to study dying techniques.  Failed it the first time, so I had to do it twice.  Failed fibres, yarns and fabrics twice.  Yeah she was probably right.  I am pretty confident with a burn test and how to dye a protein fibre on the cheap.

I wanted to change the pattern in some way, there was going to be an exposed zip, then maybe some gem stones.  I couldn't decide.  I was going through my pinterest boards and something I had pinned months ago gave me my inspiration.


I saw this top while watching Total Divas, a show I shouldn't like but I do.  This was the best photo of that top I could find, it's not on Shop Your TV for some reason.  I call the split high low hem tuxedo tails.  And compared to an exposed zip or hand sewing gem stones, it was so easy and something I will actually feel comfortable wearing.  I really love the resulting top.  I did two muslin's.  I made the largest size first.  The first muslin was way to drappy for what I wanted, darts way to low and the armholes were too deep.  Next muslin, I sized down the side seams and did a 1" FBA raising the dart point.  Left everything else the largest size.  Raised the armholes 1/2" and added the new hemline.  Here is muslin two.

Look how pleased I am
When a muslin makes you feel this fantastic you know you are on to a good thing.  I put it on and thought it looked awesome.  The resulting top went smoothly.  I used the matte side as the good side so I can feel that super soft side next to my skin.  Used a lining weight purple silk as bias binding, because I was worried about bulk.


"She's his lobster" necklace bought off etsy several years ago.  Surprisingly you can still find it here.

Wednesday 9 December 2015

Christmas Presents for Little People

I got my marks back.  Two years down, one to go.  Placement starts again in January, I am focusing on sewing as much as I can till then.  I finished my Christmas list for the little nieces and nephew really early and even though no one I know, knows about the blog I kept it hush until now just in case.

 My BF's family have really welcomed me into the family.  His oldest brother has four kids under 6 who I just adore.  Last couple of years I have made them presents for Christmas.  Some dress up's and toys.  This year I started planning early.  The eldest two fell hard for Frozen, like the rest of the planet but their true obsession is How To Train Your Dragon.  When I saw Rachel's fur vest's they went on my list. Yes I started planning in August.


I used the same pattern as my inspiration Lux Vest by Figgy Patterns. I even stumbled on the same faux fur as Rachel.  Found it in the basement of sorrows that is Lincraft in Northland.  I made the size's 2, 4 and 6.  


The eldest is starting school next year.  I bought her a Hello Kitty back pack and stumbled upon an image probably a lot like this one ...


I usually don't fall for Pinterest how-to's.  They remind me of late night infomercials.  A good idea in the moment but then you wake up and regret everything.  This one seemed doable.  About 10 years ago I made some really ugly "wallets" out of old cassette tapes.  That was a Thread Banger how-to.  Bad idea.  These looked easy compared to that disaster.  I made a practice one.  Hey I am still a student for one more year, I could use a new pencil case too.


I had these in the cupboard.  Tasty tasty Japanese treats under 70 calories.  Never tried baking the cheesecake ones like the front suggests.  I didn't do the best job.

As soon as I read about "iron on vinyl" I laughed and went straight to Lincraft for normal vinyl.  Glad I did.  I have been looking around for supplies for another project that I WAS excited about.  Before I started looking for that one piece of hardware that I need.  Now I just feel like the internet is trying to suck out my life force.  Seen a couple of people selling iron on vinyl.  Really expensive.  All sold out.  Sometimes being so far away from the US or UK is really annoying.  Also the Australian dollar.  That's annoying too. 

The normal vinyl worked fine.  I might have rushed a little in my excitement.  The first one took about 2 hours.  The good one took about 20 minutes.  Always the way.


Apparently M&M's and Freddo Frogs are her favourite. I did a better job on this one but still not stella.  The vinyl is sticky, but sews OK in my machines.  I didn't want to pin so I used sticky tape, which was a really bad idea.  The top side of sticky tape is not sticky, and the feed dogs don't work.  Bad idea.  


The wrong side
Last but not least, the 3 month old doesn't care about Christmas presents so I made her something that will amuse the rest of us.  A little Star Wars outfit.  I have made this little outfit before.  I used a free pattern from Leafy Treetops blog and small+friendly.  Last time the pants came out to big and the hoodie to small.  I printed them out at 90% and 110%.  I think it would have made them perfect EXCEPT I was silly and made the seam allowances bigger on the pants and tiny on the hoodie.  whoops.

I really hope they like them!

Monday 7 December 2015

Shopping for Christmas Sewing

My younger Brother is a tall, solid guy who likes to grow a beard and wear polyester Hawaiian shirts.  I have been planning to make him a non-polyester shirt for a while, Christmas felt like the time to do it.  The first muslin went well and serendipity happened a local shirt brand Phillips Shirts announced a fabric sale for the coming week, they only sell fabric to the public during special retail events.

Not my brother.  I googled "horrible hawaiian shirt neck beard".
A quick google and I was pretty sure we could find something the Brother would like.  Found this shirt for sale on the website.  You can see why I thought we would be able to find something.


Unbeknownst to me Phillips Shirts have been in murky waters for a while.  For a company that proclaims they never sell to the public, evidence of their previous fabric sales can be found on the net.  It was pretty obvious that their stash of fabrics had been picked over.  They made a lot of liberty shirts over the years, but the liberty pile was really really small with very little yardage left.

liberty shirts for sale
If I had been by myself I would have given up on finding the shirt fabric there but the Brother was determined.  We started chatting to one of the staff members and she pulled out a bolt of plaid that is POLYESTER but the Brother could not be swayed.


Very purple.  The Brother said he want's to enter a room and someone say "gosh that is an ugly shirt".  I pulled out a couple of deep purples and a rich emerald green and said "look these would be joker shirts" he insisted the plaid is cooler.  I had to pay extra for polyester (cottons $5, polyester $8) but he insisted it was the one he wanted.


I bought this one to make a shirt for the BF.  He is embarking on a career change in the new year.  Making him a interview shirt for good luck.  I have made him a shirt before sometime in 2014 so most of the fitting is done.  The staff member thought it might have some linen in it, gave it to me for the price of a cotton.  When the BF saw it I actually got a big smile.  Success.


I felt this one before I saw it.  Buried in the back of the silks it felt so soft on my hand I pulled it out and "ooohhhhh"ed.  It is just over a metre of the softest cotton flannel in dove grey.  It will be a winter Tiny Pocket Tank eventually.


I fell pretty hard for this fabric when I saw that emblem.  The BF has suggested I actually look up what it means before I put it on my body, and I concede that he is probably right.  It is a super soft silk, in a light blue/grey with three colour stripes and emblems.  I saw it and it reminded me straight away of Harry Potter.  The staff lady was surprised I liked the emblem.  She was cutting it and said in a sheepish tone "now it has breaks in the stripes and some logo's"  All silks were priced at $12 a metre.  


Not sure what this graphic silk will be, I might give it to another sewing person in the family for Christmas.  Not sure.  I am on the fence.  I know she would like it but could I use it to line a project I am planning for next semester.  Have to have a play with fabrics.


I "ooohhhhhh"ed over this one too.  Muted white silk.  They had a stark white silk that almost looked like it had blue in it too, but I went for this one.  So soft.  Can you see those pencil lines in it? Someone was going to cut several shirts out of this (though they are very cropped, with a massive bust dart so it may have been a womans shirt with a peplum? diversifying the brand?) and changed their mind. It was already cut in a metre and two metre lengths.  I got the whole three metre's for $12, the staff member said she couldn't use it or sell it so just take it.  It is in the wash now so hopefully it will come out.  This will be another V1247, so if it doesn't come out I will be doing some very careful cutting to avoid those lines.

Leaving you with some shots I got of the Phillips Shirts Building *cough cough* with my phone.  It is heritage listed.  I love it when Melbournians get all crazy about our history.  I should have gotten more photo's.


EDIT
The sale is still on here are the dets https://www.facebook.com/events/1649743555294866/

pencil lines didn't come out :(

Friday 4 December 2015

French Painted Vogue 1247


A little late to the party, this is Vogue 1247.  So many beautiful makes of this top have been seen around the interwebs since it came out.  Unbelievably it is now out of print.  I had listed it in a sewing planning post, and it stayed on my to-sew list all of that time.  I bought my copy off eBay, figuring better buy now since they will be hard to find soon.  This fabric has been in my stash for years, it is from Darn Cheap.  I bought it because it was so beautiful and interesting but then had no idea what to do with it.  I thought if I wasn't careful it could look very old.  My inspiration came from watching old Project Runway All Stars episodes and seeing how Viktor Luna works with print in season 3.

Look at him looking so dapper


This dress in particular really gave me the "A HA" moment.  Break up the pattern.  Instead of looking at it as a painting look at the shapes and forms that I can use.  I already had the pattern in my list at that point.

peek of a Melbourne train
I went down three sizes, as suggested by several bloggers.  I made a size 12.  It has all french seams, which I use for a lot of my tops and I really enjoyed the process UNTIL final baste to check fit stage.  All the pieces were together and I had basted the side seams to see what it looked like on.  IT WAS TOO SMALL.  I feel like I am straight up and down with very little curves but in reality I must be a bit hour glass shaped because the hips were to small.  At this point I was ready to throw it in the scrap pile and cry.  I had already planned another one in a white silk.  My BF convinced me to finish it, I didn't use French seams after that point (sob), using a tiny seam allowance at the hip finishing my seams with the overlocker.  The hem is only turned back once because it also feels to short and a proper hem with those curves seemed like to much of an ask, in the mood I was in.  I am calling it a wearable muslin. Muslin with an N.


The back is cut in two so you can see the print not as broken up, as on the front.  These photo's were taken by a good friend during a late afternoon BBQ.  She was really uncomfortable taking a photo of me front on, as this goes against her instinct's.  Angled shots make me look less fat, but don't really show off the top which was the point of the exercise.  I took this shots on the ACME mannequin when I got home.  


Ugly lazy person bar tack
I am still planning that white silk version, for a special occasion I I am planning for in the new year.  I will probably play with the sleeve length and shape of the hem, and give myself some more room in the hip area.